.PNG)
(I meant to post this yesterday, but I ended up doing stuff with my friend. oops)
What you need (coffee optional):


- colorful construction paper (the lights washed it out here, but trust me, that's pink)
- ruler
- pencil
- scissors
- invisible tape (the purple label, not the wimpy, foggy green label kind)
- shot glass (not pictured)
- 4 paper tulips (about 5.5")
- a box that needs redecorating (mine is a square but you can honestly use any kind)
Paper the sides
line up one side of the box with the edge of the paper. try to be as exact as possible. trace it and cut it out.


(this next part was all sort of accidental so bear with me. drop a comment if you're confused)
once you have your side cut out, use your ruler to measure about half an inch or an inch of paper extending from the wider side of what you just cut. cut out this strip and tape it to the side you cut out.


compare this piece to the side of the box. the inside piece is probably going to be a little wider than the inside of the box, so trim a little bit off each side of JUST the inside piece, and tape it in.


make a few little tape rolls and tape on the side piece. don't worry if the edges are a little rough just yet.


repeat this on each side until all four sides of the box are covered. I used just one color, but don't let that stop you from using a different color for each side. your finished product should look something like this:

Add the tulips
a while back, I cut out dozens of these little tulips using one of those big die-cutters. I'm sure that you can get that sort of thing at a craft store or a kindergarten classroom, but an easier and cheaper solution is tracing a cookie cutter to get the shape you want. Or you could draw one/print it out/whatever you can think of.
anyway, you'll need four of some sort of flower, about 5.5" tall.

compare the size of the flower to the size of your box. trim any excess stem.


use this one as a model for the next three flowers.

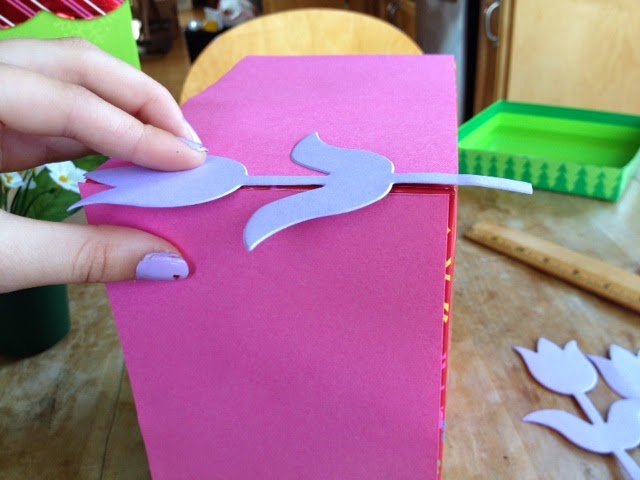
fold them all in half. be as precise as possible and make sure it creases well.
tape the first on on the first corner. use glue or tape rolls, but just on the stem and half of the rest of the flower for now. tape it on. tape the other half of the flower now.


do this on all four corners.


Tape the edges
this step is important if you ever want your box to last.
cut a piece of tape as long as one side of the box. make sure it's the completely invisible kind, otherwise you'll have a big icky tape spot all around your box. also be sure to cover at least the tip of the flowers it touches, so they don't bend or anything. you can't really see it in the pictures, but I guess that's the point.


do this for all four sides, and also do it along the bottom edges.


Scalloped border inside
when I got to this step, I realized that the lid wouldn't fit over the paper. so I had to improvise something to make the inside prettier. I liked the green that it already had, but if your box doesn't have a great inside color, just paper over it.
using scraps from cutting out the sides, pick the longest side and line up the shot glass (face down) so that it makes the size scallops you want. trace along the ruler lightly, so you have an even line across. for each scallop, try to put the glass exactly next to the one prior.


cut it out. flip it over to hide the pencil marks.


line up the straight edge with the top of the box. figure out how many scallops you will need for each side, and crease where the scallops for one side stop.


tape in just the side that you will be using first.


for my box, I need four scallops per side, so I am short just one for the excess side. figure out how many you'll need and, using the scrap from the first row of scallops, trace and cut out how many you need.


tape it in, as close as possible to the one next to it, and try to make it look like there's no split.


using the scraps from the first row just like you just did, trace and cut out the amount of scallops you need for the next side, four in my case. it's important to line up the papers exactly, so that all scallops on all sides are the same size and height. tape this in and do it again for the last side.


..and voila!
fill it with whatever you want to, and enjoy your snazzy new box. the best part about this is that, since everything is taped on, you can easily remove all the paper to redecorate as you please.
got any questions? let me know in the comments. :)
with love,
Julia


No comments:
Post a Comment